Gowanus Furniture Co.

Right now I have a couple projects in the hopper. Some to finish, and some that are new. Plan to have all completed early in the New Year.

Low Credenza

Just about all set, but still need to build the (pricey) copper frame and a few more modifications to the slab. I need to drill a half circle through it on the back so that cords can pass up to the TV and the slab be flush against the wall, and add the butterfly to prevent the crack from growing. I also need to rout some shallow grooves to hold a cushion in place when I use it for seating (i.e. party time), as well as fabricate something to put in those grooves when no cushion (i.e. book time). To go with that, I'll mount a cushion on the wall. Once I have the frame, I'll also drill some very shallow holes to keep it in place and not sliding around and accommodate the 4 rubber stops that will support it.

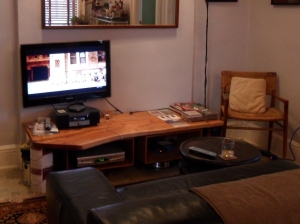
Here's the latest of it in situ.  On its paint can frame.  With the copper frame, the surface will be about about 3" higher, the boxes will remain at approximately the same height.  The radio below TV will also go and clean up the look a bit once some other audio projects are finished.

Low Credenza with Paint Can Frame

I designed the cherry boxes below to be able to accommodate rack-mount sized components.  Why, at this p0int, I'm really not sure, because,  as you can see, I don't have any.  But you can imagine in the future those will be chock full of blinking lights.

Bike Rack


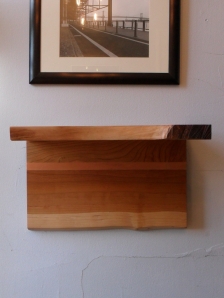
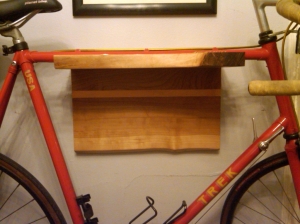
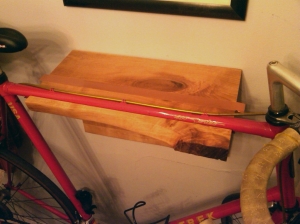
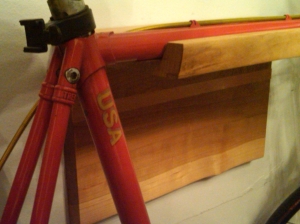
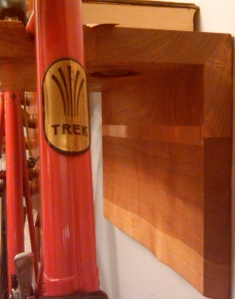
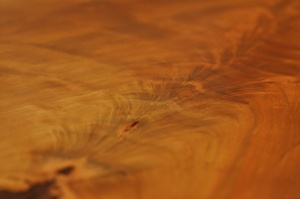
Done.  Take a look:

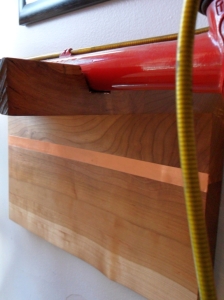
I used Plasti Dip (the rubber material on things like pliers) to line the channel rather than using bicycle inner tube. (Note from the fourth picture that the top tube isn't resting on the copper,  only the rubber.) Inner tube was a clever idea, and would have been a great way to re-purpose materials, but too tough to get something that was never intended to be a flat surface to behave as a flat surface. I was thinking I could build some sort of jig to keep it under tension while gluing, then release it and trim the excess, but just too complicated for the time being.

I have it currently tanning perched on my windowsill. A friend of mine saw it as he was driving up 3rd Avenue. Thought it a bit odd.  Been just a few sessions, and it still looks a little blah, but even with just a few hours the color is getting a deeper. Still considering some sort of hooks to hold helmets and such, but reconsidering and think they may be a bit impractical if the bike rack is hung at a low height (e.g. waist level).

Shelving System

This moving along.  I was able to get the walnut plywood delivered to the shop on Monday. Free delivery is great, but only if they're in the area. Thankfully it all worked out and was  far superior to me carrying a 4' x 8' sheet of 1" thick plywood down 3rd ave from my apartment. Ugh.

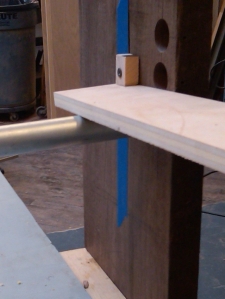
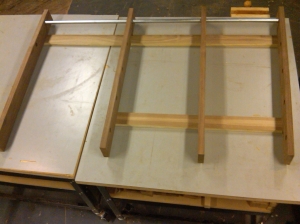
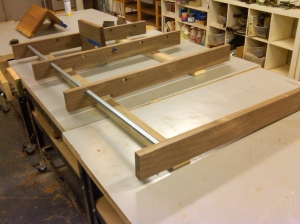
This particular piece is going to be for a kitchen and a combination of a pot rack and shelving system.  The following picture gives the gist of how the shelves will work.  Just think thicker walnut plywood and imagine a shallow channel in the underside of the plywood that fits over the pipe and keeps the shelf in place.

Here are some more shots of the current project.  The bottom two thirds of the vertical piece on the left will eventually be removed.  There will be two pipes spanning the entire width, and an additional three on the right side for a total of five.

Cutting Boards

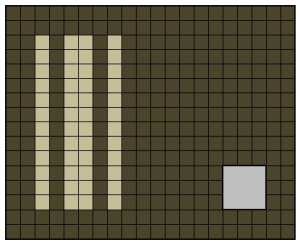
I've been looking to make some very substantial end-grain cutting boards for a while now. I'm want to monogram the cutting boards with initials in a sort of Morse code "barcode". Dots will be a stripe 1x wide, a dash is 2x wide. New but timeless.  Personalized for you.  Walnut and maple.  This boards will also be thick - 2".

There's are lots of really cool end grain boards out there. I like them quite a bit, but want something more substantial.

I also intend to do custom boards that will fit over your sink! Wow!  Here are the plans for the two I'm working on now.

This is one for a friend:

This will be one for me.

The stripes say "R" (I might move them right a bit, not sure yet) and that little square on the bottom left is a 3" x 3" hole under which one of those Wonton soup containers will fit just right. I can then chop my onions and the skins go into the hole and into the container. My kitchen has - no joke - 2.22 square feet of counter space. This cutting board over my sink would increase my counter space by 100%.

Both of these will be close to 16" x 20", and about 2" thick. Heavy. No joke. But the last one you'll ever need. And the surface will be soooooo smooth.

What do you think?]]>

A certain Swedish furniture company has a line of bookcases that are pretty popular. They're made of particle board, in sizes to fit any apartment, and at prices anyone can afford. It's not a bad way to store your books. Really. I should know as I have more than a couple of them, complete with extension units to stretch all the way to the ceiling. Please, don't tell...

But they're cheap. And ubiquitous. Which makes them super cheap and easy to find on Craigslist.  But by that point they're sort of falling apart.

Part of their popularity stems from the fact that, for the price, they're not terrible. Like a box of mac and cheese.  But for a little more we could all do so much better....  Though these bookshelves do hold your books. And so long as you play the game and spend 25% more to have them NOT be white, they don't look too bad.

I'd love to buy all my furniture while I wander around SoHo, but sadly my monocle was crushed when they delivered my last case of yacht wax, so until I get that fixed, I'm relegated to other options.

Crate & Barrel and its ilk have some options.  But whoever is making it won't bike over to my place and take measurements.  There's also lots of great work made throughout Brooklyn, but that is pretty expensive - as great work should be.  (Actually, truth be told, most of what I have I bought used and like a lot, but it would be great if it were possible to get a customized piece that is simple, sophisticated, and affordable.)

I want to make a better option.  Here are the features I plan to include...

  • Shelves can be added or removed, but the spacing between the shelves is fixed. Likely about 10".
  • It will be all open.
  • A wooden and metal frame will mount on the wall, and the shelves will cantilever out.
  • The materials will be relatively inexpensive (e.g. furniture-grade plywood and conduit), but the wood will be considerably stronger than particle board (with hardwood covering any unsightly plywood edges).
  • The finish on the wood will be simple, elegant, and durable.
  • The whole piece will hang from a concealed French cleat, and the placement of the cleat can be adjusted to account for the wavy and bowed walls common in old apartments that make arranging anything difficult.
  • Design and installation will be included in the price.

I'm begining a prototype that will be used as a kitchen storage system. It should be finished early 2011. I could see this also being used as a wall-mounted closet system, with the appropriate supports to hold a closet bar about 10" out from the wall, complete with shelving above, shoe racks below, and all that.  It would also be great for store fixtures.

It will cost more than the Swedish alternatives, but will be a much better value (and I can only assume will have a considerably higher resale value, should you - surprise! - be moving again and can't take it with you...).

More details soon...

]]>

It's getting cold, soon be snowy. There's a chill in the air, and we all need something that will warm us heart and soul. Here are my two favorites... Detractors may say they were their grandfathers' favorites. To them, I say these are timeless.

So very easy to drink.  Very easy.

Rob Roy

3 parts scotch
1 part sweet vermouth
garnish with a cherry

Rusty Nail

3 parts scotch
1 part Drambuie
garnish with a hi-fi and a console television

Please don't bother with a jigger or a shaker.  Just pour it in a glass with some ice and swirl it around. Excellent with good, inexpensive blended scotch like Grant's or White Horse. (Primary malts for Grant's include Glenfiddich and Balvenie, White Horse a bit peatier w/ the young Lagavulin and Caol Ila. Dewar's or Johnnie Walker Red have nice ads, tho, but I wouldn't drink them.)

Your sons will thank me.

]]>

Brought home the bike rack last night. Still need to trim some of the copper (purchased from Veneer Supplies - great folks and really helpful) and line the sides of the channel where the bike rests with rubber bike tube, but was excited so put it up. The bottom of the channel is also lined with copper. The bike never touches it as the tube is supported by just the sides of the channel. Originally intended to construct some hooks under the shelf. Depending on the height, maybe not - maybe too low depending on where it hangs? Will need to mull...  Better non-Blackberry-pics forthcoming...


]]>

Hey there. Hope you had a great Thanksgiving. I still have pie in my fridge, and that's always good (was a lot of pie, but now nearly done, sadly). So I thought I would be done with this project in two weeks.  

Well, almost...  Here are some recent pics:

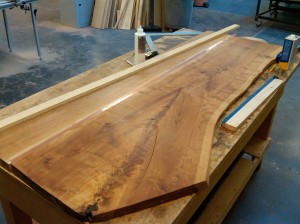
Gluing up the two pieces was a bit of a challenge.  Modern wood glue is amazing stuff, and, if done right, the bond is stronger than the wood - however a good part of that strength relies on sufficient clamping pressure, and if just two pieces at a 45deg angle, it takes some clever clamping.  Below is how I did it.  You can see the cherry along the bottom and right sides, with pieces of scrap cut to create a right angle to help with clamping.

After it dried, removed the bark and finished the edges.  (So smoooooth!!!) I also routed two thin grooves along the seams on both pieces to inlay another two strips of copper (similar to the credenza).  Below you can see the shape of the channel that will hold the bike drawn onto the edge of the wood.  When the top tube is resting in the channel, there will be a small gap at the bottom.  The tube will be cradled by the wood - not resting on it.  The parts that support the bike will be lined with rubber, the gap on the bottom with more copper.

]]>

Get out of the city. Get into the woods.

I really love to get out in the woods for a few days at a time and cover a lot of miles.  Occasional day hikes are nice, as are trips with less in the way of hiking and more in the way of bourbon and cigars, but, if on my own, I like long days with a lot of walking.

Here are a few hikes I've done that are accessible via public transportation from NYC for those looking to get out for a few days.  Most of these are pretty high-milage, but they can usually be split up over a longer period, if so inclined.  In the coming weeks I'll post a bit about what I usually carry, eat, etc.

(I'll keep updating this page with info about more hikes I've completed and those that I still need to do...)

Appalachian Trail - Manitou stop (MNR - Hudson Line) to Appalachian Trail stop (MNR - Harlem Line)

Fall 2006 & Spring 2009

Approx 45 miles (2 days), sleep at RPH Shelter at approx mile 25

I've tried this in both directions, and south to north is a bit easier, and if running late and miss the intermittent train from the hiker stop, can always walk to the Wingdale station (don't really have that option north to south).  It's long, and not terribly scenic and never really fully away from the sound of traffic (if you listen carefully), but if it's a gorgeous weekend and you need to get out, it's quick and easy.  The RPH shelter is convenient - can sleep in there, or pitch a tent nearby.  For a hike like this, for me, food is less important, I'll be back the next day, and why carry more than needed?  Bare minimum.  If I'm a bit hungry when back on Sunday, that's fine.  Keep it light & fast.

Long Path & Suffern Bear Mountain Trail - Harriman (NJ Transit) to the Manitou stop (MNR - Hudson Line)

Spring 2007

Approx 36 miles over 3 days, sleep at the Stockbridge Shelter at approx mile 10, and the Big Hill Shelter at approx mile 20.  I got a ride from the train station to Route 6, saved a mile or two, but still about 2-3 miles of hiking on the road at the beginning

Almost entirely within Harriman State Park, and first time for me on the Long Path (which stretches from the George Washington Bridge all the way to Albany).  Some great views along the way, and was able to see the NYC skyline from Big Hill.  Be careful though - I remember the Stockbridge Shelter had no water source, which I discovered as I was about out of water and had foolishly spent the evening before carousing late into the night.  Dangerous...  Thankfully someone had stocked the shelter with gallons of Poland Spring.  Very kind.  Would have been a bad situation otherwise.

Appalachian Trail - Port Jervis (NJ Transit) to the Delaware Water Gap (Bus)

Summer 2009

Approx 42 miles over 3 days, sleep at Gren Anderson Shelter at approx mile 11 and Mohican Outdoor Center at approx mile 31

With the travel to and from Brooklyn, was able to get in fewer miles on Day 1 & 3, so stretched it over 3 days.  Some of the hiking in New Jersey was gorgeous and incredibly easy - hiking along the ridge on a smooth dirt path. If I remember, Gren Anderson was pretty full of mosquitoes and it really rained hard, tho the Mohican Outdoor Center was good fun. It cost $15, but I was able to buy a tasty sandwich. It's run by the Appalachian Mountain Club.

Appalachian Trail - Harriman (NJ Transit) to the Manitou stop (MNR - Hudson Line)

Fall 2010

Approx 23 miles over 2 days, sleep at the Fingerboard Shelter at approx mile 4 or the William Brien Memorial Shelter at approx mile 11

This is one of the first sections of the Appalachian Trail to be laid out early last century.  We opted for the closer shelter (Fingerboard) and it worked well.  Ended up hiking at night a bit the first day.  The glowing eyes of deer in the distance from our headlamps were a little creepy.  Hiking up and over Bear Mountain was very interesting - in the last three years or so they have built granite steps into what seemed like the entire trail.  Well maintained trails are one thing, a sidewalk is another.  Still a great hike for a day.  Don't miss the Zoo.

Harriman State Park - Tuxedo (NJ Transit) to Harriman (NJ Transit)

Spring 2011

Approx 20 miles over 2 days, sleep at Big Hill Shelter at approx mile 8

Great hike - with relatively easy terrain except the appropriately named "Agony Grind" - and we had plenty to time to drink bourbon and smoke cigars.  We also developed a pretty great new dessert.  I wanted to make a cobbler, but it's tough to bake on the trail. The Bakepacker is a pretty cool device. We tried to replicate it with some beer cans, and came pretty close. Our apple cobbler was very tasty. Certainly will do it again. Big Hill Shelter has some great views and multiple fireplaces. We were able to make out the NYC skyline.

Still to hike...


Appalachian Trail - Harriman (NJ Transit) to Port Jervis (NJ Transit)

Approx 50 miles over 2 days

This is the last bit of the Appalachian Trail I need to do in NY & NJ, and I should be able to do it in 2 days, but can be difficult due to the late start since need to get there - will have to do it in the summer when on Daylight Saving Time.]]>

The two boxes are done, and the slab was glued, so now had to put finish on it.

Finishing the two boxes was quick - a light sanding and a coat of Danish oil. Finishing the slab took a bit longer.

After removing the bark from the front and finishing that edge, I finished the top with an orbital sander, and finished it with a coat of Danish oil. In hindsight, I could have sanded less, applied the oil, then sanded the wet surface to save some time, but do like how very very smooth it is. Once I put on the oil, it really looked amazing.

I wanted the surface to be as smooth as possible and finished so that the grain would be something you could just stare at for hours.

There's a seam where the lumber is glued to the slab. The two pieces are matched up pretty well, but it's still quite noticeable, so I wanted to inlay a thin band of copper along the seam and thought that would look really cool.

I routed a very thin groove into the piece, then did a bit of filing to make sure the copper fit perfectly. I bought a sheet of copper from Veneer Supplies and the adhesive. I wish I could get the copper in a roll - cutting identical strips to run the length of the board was much harder than I thought. The copper adhesive has worked well so far, but I should have planned the clamping better. Parts of it have a bit of a tacked-on-with-a-hot-glue-gun sort of look. Gross. Well, maybe not that bad, but it could certainly look better.

It's currently in my apartment (resting on paint cans until I finish the copper frame) with the boxes below, and is looks just as I planned. I noticed a crack extending from the narrow end of the slab - I need to add a butterfly to stop that from spreading. The final step will be rout a thin grove in the narrow end that will keep a removable cushion in place (cushion for seating for parties, books when just me), as well as cutting a small notch in the back edge on the wide end to allow cables to pass from the TV above to the DVD player below, etc.

Stay tuned for part III and more pics...]]>

Categories

Recent News